Tuesday, December 4, 2007

Origami Gift Box!


Here is the Origami Gift Box project I promised yesterday! It was inspired by the Holiday Project Blitz on SCS! Jenn Balcer wrote a great tutorial (here - (http://www.splitcoaststampers.com/resources/tutorials/origami_box/), so if you want details on how to create the box itself, click on the link for awesome instructions!

I made this box and matching card as a birthday gift for a niece. Jenn's tutorial came along at just the right time! The box is big enough to hold a small jewelry presentation box (earrings- or ring-size), which is just what I needed!

I used a full 12" x 12" piece of designer paper for the top, and another for the bottom. This paper is from Basic Grey's Urban Couture collection. Isn't it beautiful? I got it at eP (see link on the right), one of my favorite online shops!!! I got the Prima flowers there, too (thanks, Daisy)!

Once the box was made, I embellished it with the gorgeous chocolate satin ribbon from SU!'s Theater ribbon collection. Then, it just needed a tag. The tag layers are (from bottom to top): scallop-punched Chocolate Chip CS; more of the DP punched with a 1.25" circle punch; a Prima lace collection flower; and the brad is one of SU!'s Build-a-Brads, using more of the DP stamped with the small flower from SU!'s Baroque Motifs set. I LOVE these Build-a-Brads! They add such a "finished" look to things!!! The tag was attached to the ribbon with some SU! copper cord (ret.).

This box matches the card I posted yesterday. Scroll down for info, and thanks for looking!

Monday, December 3, 2007

Did You Know...

...how EASY it is to dye the flowers in Stampin' Up!'s "Pretties Kit?!?" It is incredibly easy! Those little blooms absorb ink like you wouldn't believe! Here's a birthday card I made for another of my nieces (in November), which uses a couple different techniques to dye the flowers.
This square (4.25 x 4.25") card was made using Chocolate Chip card stock and one of Basic Grey's GORGEOUS Urban Couture papers. It coordinates beautifully with SU!'s Almost Amethyst ink! Taking my color cues from the origami gift box I made for my niece (which I will post next), I stamped the DSP with SU!'s Baroque Motifs set, using CRAFT Almost Amethyst and CLASSIC Basic Brown inks. I never would have put Chocolate Chip, Amethyst, and (esp.)YELLOW together, but the paper tied the color scheme together like a dream!

Of course, for a vintage-y look, one must distress the paper a bit with a distressing tool and some DTP (Direct-to-Paper) inking. Paper piercing, too, adds to the look.

The lovely velvet ribbon on the top L.H. corner is from SU!'s Theatre ribbon collection. Isn't it YUMMY?!? I would buy an entire spool of this stuff, if I could! I used the Key Tag punch for the sentiment papers, and stamped it with the Happy Birthday phrase from Warmest Regards (ret.?).

The largest flower was created with SU!'s scallop punch (Chocolate Chip), 1.25" circle punch (Almost Amethyst), a Prima "lace" flower, and topped off with SU!'s new Build-a-Brad in Pewter (stamped w/Baroque Motifs flower in Basic Brown). WHEW!

The uppermost flower embellishment was created with SU!'s Pretties Kit stick pin, pearl bead, and clear teardrop bead. The small Pretties Kit amethyst flower was next (inked with the amethyst pad and then highlighted on the edges with a marker -- both inks absorb QUICKLY!!!), followed by two more Prima lace collection flowers (cream/script & cocoa). The cocoa flower was rubbed on the Basic Brown pad to bring out its texture more and help tie it in better color-wise.

The smallest flower, on the R.H. side of the bunch, was two of the Pretties Kit flowers, in different sizes, dyed with the Caramel and Amethyst stamp pads. The center is a pearl "stamen" left over from when I made my grandparents' card cake. It was a very fun project -- I hope she likes it!!!

It's Beginning to Look a Lot Like...

CHRISTMAS!!!!!!! See all the beautiful white stuff God sent to us on Saturday?!? We awoke to 4 inches or snow, and then it continued snowing into the afternoon, and we ended up with SIX inches that day!!!

The boys went sledding twice on Saturday and had an absolute ball! What a wonderful day!

Aren't these trees and bushes in our front yard lovely?!? I love snow-laden trees!


This is the view from our back deck, Close to the middle of the yard...


And this is the view from the deck, into the right-hand corner of the yard (the rose arbor!)...


Here is the left-hand view of the yard...


And the bird feeder...


I tell you -- with each change of season, I always marvel at the things God has created and how well He orchestrates them all! Everything designed to perfection... such amazing variety (even no two snowflakes are alike)... Our God is AWESOME!!!

Saturday, November 17, 2007

Glitz Galore!

Hey... So sorry it's been so long since I posted last! Time sure flew... Yikes!

But, I'm back now and hope to share some fun things with you! The card I'm posting today is one I made for a sweetie-pie friend of mine (hi Katie!), for her birthday! She loves PINK and BLING, so I thought I'd accommodate her in that! LOL!!!


The background papers are from Basic Grey's "Perhaps" 6"x6" paper pad. I did the wallpaper "wainscoting" thing. After adhering the 2 backgrounds to the Pomegranate panel, I took my Essential Glue Pad and stamped the Stampendous flower with it -- and then added SU!'s Dazzling Diamonds, of course! LOL!!! This gave the background a glittery swirly effect (can't really tell in this photo, though).

Then, after tying the Pomegranate stitched ribbon at the paper seam, I added SU!'s (ret.) Vintage Diamond Mini-brads to the corners of the panel.

I stamped the Stampendous bloom again, on vellum CS, Pomegranate CS, and one of the "plain" Perhaps papers, using my Palette Noir black ink pad (that pad is FABULOUS!!! First time I've used it and I was very impressed by the coverage, etc.!). After letting the ink dry, I cut out all three flowers and shaped their petals with my fingers. And, of course, added more Dazzling Diamonds glitter to their centers, with the help of my Sakura Quickie Glue Pen! I LOVE how you can control exactly where you want that glue!!! It's FABulous, Dah-link! The flowers were mounted onto the card using dimensionals.

The last touch was the Happy Birthday sentiment (SU!), stamped on more of the pink Perhaps paper, punched with the ticket corner punch, and backed with a Pomegranate panel done the same way. Added more diamond brads, mounted it on dimensionals and, voila! 'Tis finished!

In case you are wondering, all the non-Stampin' Up! items listed here I got from eP (eclectic Paperie at http://www.eclecticpaperie.com/index.html), my FAV online paper-crafting store!!! In fact, it has been impossible to find the glue pad here in the SLC area, at least in the major craft stores. I know, because Katie looked for one ALL OVER after I gave her this card! LOL!!! Nothing like being an enabler, eh?!? LOL!!!

Anway, HAPPY BIRTHDAY, Katie!!! Have an AWESOME year! (Go check out the cake her DH decorated for her, here: http://eitakwilson.blogspot.com/2007/11/birthday.html -- Don't you just LOVE the cute hearts he made with ALL THAT FROSTING?!? LOL!!!)

Monday, October 22, 2007

Jewelry Gift!

I mentioned earlier that I'd post a picture of the jewelry I made for my niece (Funky Color! post), after I knew she had opened her gift, so here it is!

Chains are really big right now, so I wanted to do something with a great chain! I found this silver-electroplated chain at the Gem Faire in September, and snapped it right up!


Then, I needed to pick out some great beads for accent! Since my niece's favorite color is PURPLE, amethyst was the only stone to consider! LOL!!! Then, I found these AWESOME rock crystal (quartz) beads, as well, and HAD to add them to the mix! (I NEEDED them!!! LOL!!!)

So, here is the finished product... A long necklace, to wear in a single layer or drape in more layers, a matching bracelet, and earrings! Oh, what fun I had making these!!!

And, to top it all off, she LOVED them!!! Happy birthday again, Stacee!!! Love you!

Monday, October 15, 2007

Funky Color!

Yikes!!! It's been too long since I posted last... Hopefully, I can be more consistent from here on out...


Anyway, here is another gift set, for another niece of mine, that I just sent out for her birthday! The colors are, to me, a bit funky and definitely a "stretch" for me, but they are close to the colors in her bedroom (she does admit her room is a tad on the bright side, and she doesn't need a light at night! LOL!!!)... But I didn't really use the orange in her room so much... Instead, I pulled the coral and rose red out of the Fancy Pants paper that I chose because it screamed her name to me -- KWIM?


The card here is 4.5" x 4.5" square, plus the scalloped circle hanging off the top of it. I know I CASEd this concept from someone on SCS (Cambria?), but can't put my finger on who...

The card base is Cameo Coral, layered with Rose Red and the darling FancyPants paper, Aged Florals - Honeybunch. The paper-piercing template aided me in creating the corner accents. The sentimant is from SU!'s Warmest Regards set.

I used my Giga Punch for the large scalloped circle, and cut the patterned paper with my circle Coluzzle. Punched each scallop with my 1/16" circle punch, stamped the flower from SU!'s Looks like Spring set, with Rose Red craft ink, let that dry, then set the pewter jumbo eyelet for the flower's center.

The small "flower" (scalloped circle) was punched with SU!'s new scallop punch and 1.25" circle punch. I used Mellow Moss 1/4" grosgrain ribbon for the flowers' "stems" and "leaves," tucking the end under the Rose Red layer of the card to finish it off.


Here is the gift box I created to go with the card. It is just a simple, white necklace box, finished off with a "belly band" of Rose Red CS and the same Fancy Pants paper I used on the card. The tag is, again, made with SU!'s new scallop punch (gotta tie in the scallop motif, you know!) and SU!'s 1" circle punch. Punch the small circle first, with enough space around it so the scallop punch can do its job. Punch another scallop in the designer paper, and layer the rose on the patterned paper to make a cute little flower. Punch a hole in each scallop (1/8" punch), tie the tag on with Moss grosgrain ribbon, and you are done!

I'll post the gift itself after I know she has opened it!

Happy birthday (tomorrow), Stacee!!!

Friday, September 21, 2007

A Small Gift...

... for one of my nieces!

Her favorite color is PINK and she is turning 14 this year! What do you give a young teen for her birthday?!? Why, JEWELRY, of course!!! Especially if she is a FASHIONISTA like this one (and her sisters)!!!

So, here is the gift I made her:
This jewelry set is made with Chinese pink opals, rhodonite, onyx, and silverplated beads, with sterling silver spacers and findings. I hope she likes it! I LOVE pink and black together!!!


Here is the gift box and card together. I had to stick with the pink and black theme, you know! LOL!!!


Here is the card and the creative deets:

Stamps: Oh, So Lovely
Inks: Going Gray, Basic Black, Pretty in Pink, Pixie Pink
Papers: Pixie Pink, Basic Black, Whisper White
Other: Aquapainter; Pretties Kit Rhinestone Brad; Doodlebug Paper Frill (white, dyed with Pixie Pink pad); Flower & Leaves from Michael's.

I CASEd this card from Chrissyd723's cards, here: http://www.splitcoaststampers.com/gallery/photo/664375. I totally fell in love with the gray background stamping she did, and then the colored focal point done with the same stamp. I think it is an elegant way to tie background and foreground together! Thanks, Chrissy!

I embellished the gift box very simply, by just wrapping a 2-inch designer paper strip (Fancy Pants Designs, "Lovebird") around the center for a belly band and adhering with sticky tape. Then, I punched a 1-inch circle out of Basic Black CS, centered the circle in the scallop punch, and got a cute little black "flower" out of it. Backed the black with another scallop, punched from Pixie Pink CS. Added detail by punching each scallop with my 1/8-inch circle punch for a more "lacy" look. Tied the scallop gift tag onto the box with (ret.) black organdy ribbon, over the paper band, and wrote my niece's name in the center of the flower. I like how it turned out! I hope it's a hit!


A Glimmer Mist Gift! Go eP!!!

Woo-hoo!!! Have you seen what eclectic Paperie (eP) is offering their customers this month?!? Get a load of THIS (from an e-mail I got from eP):

JOIN THIS GlIMMER MIST PARTY!

We are excited to host our first event called "An eclectic Coterie". We've all heard the buzz on Glimmer Mist by Tattered Angels. They are releasing seasonal colors for a limited time only. So we are having a party for all Glimmer Mist fans. The more people that come to the party, the more free Glimmer Mist you get! Read more for offer details and don't forget to invite your friends.

An eclectic Coterie - Glimmer Mist Limited Edition Special

The Details: Purchase all twelve (12) seasonal colors for $79.99 (plus shipping).
FALL: Aspen Yellow, Autumn Leaves, Harvest Orange, Juniper, Merlot, and Red Maple. WINTER: Frosty Nights, Gingerbread, Winterberry, Mistletoe, Snowflake and Sugar Cookie.

Now some the additional FUN Details: If we sell 40 bundles, everyone who purchased the seasonal bundle will receive a free bottle of Glimmer Mist Patina($6.95 value)absolutely free!

If we sell 80 bundles,everyone who purchased the seasonal bundle will receive both Glimmer Mist Patina AND Glimmer Mist Antique Brass($6.95 value) free.

That is right. The more people at our Coterie, the more free stuff you will get with your bundle purchase. We'll keep you posted on the eP blog as to how many more people we need to invite in order to add free Glimmer Mist to your packages. So your mission is to share this offer and enable all your friends. The more people who join this coterie, the more Glimmer Mist we all add to our collection. These limited edition colors are only available for the fall and winter season. eclectic Paperie is making this exclusive offer through this special newsletter. This eP Glimmer Mist special will not ship until the eclectic Coterie is over.

This special offer is only available from September 18th to September 30th. These special orders will not ship until early October.

Please email info@eclecticpaperie.com if you have any questions. Visit the eP Blog for more information and photos of how Glimmer Mist can work into your paper crafts. Glimmer All the Way!

Daisy & Joy

***************************
So, how about it?!? I know *I* want some of this cool product! If you need further motivation, go to Vicki Chrisman's blog (listed at right) and check out her awesome projects! She's the QUEEN of Glimmer Mist!!! LOL!

M.

Tuesday, September 18, 2007

My 93-Year-Old Grandparents!

Oh, I have to say it was SO WONDERFUL to be able to share my grandparents' 70th anniversary with them!!! They are two of the dearest people in my life, and I can't even begin to express my deep love for them, and the great JOY I feel when I get to spend time with them!!!

And, bless their sweet hearts, they are still VERY spry and healthy for their age -- 93 years old!!! I just want to share a few pictures of them with you, since they are so special to me!

Here they are, next to the card cake I made for them -- getting ready to greet their friends and family at the anniversary party! Isn't my grandmother ELEGANT?!? Still straight as a pin, and dressed in her favorite colors, too! Granddad is looking pretty dapper as well!

Here, they are reading together a note someone wrote to them...

And, last but not least, here they are laughing about something... I think I still see a little "spark" there! (Isn't is SO CUTE?!?!) What do you think?!?

GOD BLESS MY GRANDPARENTS!!! Heaven knows how much they have blessed MY life, for all these years... I LOVE YOU, Grandmother & Granddad!!!

M.

Wednesday, September 5, 2007

70 Years of Marriage!!!

WOW!!! My maternal grandparents will be celebrating their 70th anniversary this Saturday, Sept. 8, 2007!!! What an accomplishment! I definitely admire them for this! Not too many people get there... They are such a neat couple, and I'm sure their faith in God has been the foundation for their strong marriage! I hope I get there, one day... I was figuring it out the other day and discovered that I will be 102 that year! LOL!!! (Whew!!!)

Anyway, one of my uncles is planning a "surprise" reception for them on Saturday! (I'm not sure it will be a complete surprise, though... He placed an announcement in the paper and Granddad reads the paper regularly! LOL!!!)

My contribution to this special day is this "card cake" I just finished making today! It's a container for the cards they may be receiving. When I saw the one Vicki Chrisman posted on her blog, I knew I had to make one as well! Hers is FAB-OOOOOOOOOOOOOO!!! (Check it out here: http://vickichrisman.blogspot.com/2007/08/beautiful-day-for-wedding.html)

Knowing that my Grandmother's absolute favorite color combination is blue and white, I took those as my color cues and found some lovely ribbons at Hobby Lobby! I think I went a bit overboard on the ribbon -- what do you think?!? (Couldn't resist!!!)

Here is the "big picture" of the completed cake front:


And back:


And, here is some detail as well:
I stamped the boxes with SU!'s Brocade Basics stamp set, using my Essential Glue Pad and applied Dazzling Diamonds glitter (this is their "diamond" anniversary, after all! LOL!!!). The card stock I used for the flowers was SU!'s Bashful Blue, Ballet Blue, and white vellum. I punched out the petals with both the large and small oval punches, curled each petal, and adhered them to a smaller circle base in the matching color. The bling in the flower centers are the clear rhinstone brads from the Pretties Kit! Love them!!! The leaves were punched from vellum, then I used my stylus to create the veining and make them more dimensional.

The lacy edging on the box tops is just the edges of square paper doilies. I had to use several pieces to make it all the way around the cake, but the doily corners made a good accent at the seams, I think! Looks a lot like Battenburg Lace to me!

The photograph in the frame is one taken of my grandparents about 20 years ago... I wish I had a photo of them as newlyweds but, alas, I do not! I'm so excited to see them this weekend!!! Thanks for sharing my joy with me!

Monday, September 3, 2007

A Back-to-School Oldie...

ETA (Edited To Add): A tutorial for this project has just been posted on SplitcoastStampers.com! If you want to see the tutorial, here is the URL for it:

http://www.splitcoaststampers.com/resources/tutorials/backpackbox

Thanks & blessings,

M.

Hi!


Just so you know I haven't forgotten about my blogging family, I thought I'd post a project today. I can't yet post what I've been working on this past couple of weeks, so here is a project from my *ancient* past, when I was a Stampin' Up! demonstrator! LOL!!!

I created this project from an existing box on the demo website, tweaking it here and there to create a backpack, for a Back-to-School swap I was in. Just might be appropriate for NOW, eh?!? LOL!

Not much stamping here, except for using the Classic Alphabet and Numbers sets (ABC, 123)... Used my coluzzle to create the flaps and Velcro half-circles to close the flaps...

I think the rest is pretty self-explanatory, but if you have any questions about it, feel free to ask! Just be sure and leave your e-mail addy on your post so that I can reply, okay?
Happy Back-to-School time!!!

Saturday, August 18, 2007

Sports, Injuries, The "Sports Mom" Thing...

YIKES!!! Ya know... When I signed on to be a mom, I didn't count on a lot of things... Like sitting for 2-3 hours at a sports practice, when my son can only WATCH, because HE BROKE HIS WRIST!!!

But, that's what happened... He broke his wrist at school last Wednesday, during recess -- playing football, wouldn't ya know it -- and now he can't practice football with his team! But, as a dutiful supporter of his team, he "gets" to go to practice and watch, in the rain, wishing he could do it all with everyone else... Poor kid!

This is the one who did the flip off his bike and got 7 stitches in his mouth. Now he has a "buckle fracture" on his left Radius... At least he is right-handed!

This is the one who just "knew" he would be "good at football," causing us to get him AND his brother signed up for the sport!!! (I won't even begin to discuss the cost difference between football and the other sports he has played -- let's just not go there.) And, of course, we couldn't get a refund on his fees, even though the games haven't even started yet... Sheesh!

But, motherhood IS rewarding! (If I say that often enough, it will begin to sink in, right?!? LOL!!!) At least I get to build some more character... Even though I'm enough of a character to begin with... ROFLOL!!!

Well, enough rambling for now... Gotta go back to my mothering duties! Here's to all you mothers out there! May you always see the silver lining!

Blessings,

M.

Friday, August 10, 2007

MIA...

Hey!

You may have been wondering where I disappeared to, since I haven't been blogging for a while! Well, it's called going home to see family (1 week), having family come see us (for 10 days), and then working in our VBS program for a week! Whew!!! It's enough to keep a person pretty busy!!! Good, but ***BUSY!!!***

Tomorrow, the VBS families are going to have a swimming day and, on Sunday, we get to present a program for the parents, sharing what the kids have learned all week (and I'm the one who gets to recap it all for them! LOL!)... So, sorry, I'm not posting any projects today or this weekend, but maybe Monday evening, after I've had a chance to stamp again!

I have to share something else, though! I've been ***highly honored*** by being listed on eclectic Paperie's eP Friends list a few weeks ago!!! Woo-hoo!!!! Thank you, Daisy & Joy!!! You should see the other eP Friends listed on the eP blog (http://eclecticpaperie.blogspot.com/)... They are all such fabulously-talented women... WOW!!! I'm a little intimidated to be in their company!

Anyway, that's the news from here, and I'll be back to posting more regularly next week! Chatatcha later!

M.

Monday, July 16, 2007

For My Dad...


I LOVE the new Crafty Secrets Clear Art Stamps! I picked up the Bird Notes set from Eclectic Paperie and *had* to use them on a birthday card for my dad! He's such a bird lover!!! He has a gazillion bird feeders in his yard and loves watching the birds visit them! So, here is what I came up with...

The card base is Chocolate Chip, with layers of True Thyme (distressed) and the new Brocade Background DSP (sanded) from SU!

The bird image was stamped on Very Vanilla CS, then colored with my aquapainter and River Rock ink pad. I used my Watercolor Pencils from SU! to lay in some more detailed color on the birds and branch, then used my Bashful Blue ink pad and aquapainter to color in the sky. The edge was distressed for more dimension.

The bird feathers were stamped in a line, using black, on the DSP panel. The sentiment is stamped with Basic Black on Very Vanilla CS, again distressing the edges.

Chocolate Chip CS was punched with the Word Window punch and attached on one side with the brass Vintage mini-brads.

It's a pretty simple design but, I think, effective for a man's card! Hope you like it!

Another Creative Outlet for Me!

I'd like to share with you one of my newer "vices" that I've been involved with lately... You know that beading craze? Well, it hit me, too!!! LOL! Here are a few projects that I've made in the past couple of months...

This first jewelry set is made from blue lace agate and Austrian blue crystals, with silver spacer beads. The photo doesn't do it (or the others) justice at all.

The next set is snowflake obsidian, black onyx, and these CUTE little turtle beads! I LOVE turtles... The turtle was my personal mascot, bestowed on me by a teammate, when I was swimming with my high school swim team (slow and steady wins the race, I guess! LOL!)

I love the speckles in the snowflake obsidian! What a pretty stone!!!


This last set is much more simple, but is a great "everyday" kind of set... It is made with sodalite and silver beads. Since blue is my favorite color, and the sodalite goes so well with denim, I "had" to make this set for myeslf! And, of course, the cross has tons of meaning for me. I like to wear a cross everyday. Guess I'd better make more jewelry with crosses, so I have one to wear with every outfit, eh?!? LOL!

Thanks for looking!

Monday, July 9, 2007

I've been Tagged...

...Thanks Charmaine!!!

Ok... If you don't know Charmaine George, you're missing out! She's an "ultra-cutie," who has lots of interests that aren't your run-of-the-mill American-type interests!!! She blogs, too, and here is her site: http://charmainescafeink.blogspot.com/. Check it out and you'll get a taste of what I mean, esp. if you read HER "tagged" post!

So, I've been "tagged!" That means, I get to list 7 little-known facts about myself, and then tag someone else to do the same!

Here are my facts:

1. Even though I'm *VERY* outgoing and **LOVE** spending time with my friends & family, I also ***ADORE*** having time to myself, for myself, by myself. Guess it's a "personal space" issue -- or, maybe just a reaction to having grown up with 8 siblings! LOL!

2. People think I'm always "up" but, in reality, I have plenty of crabby moments -- esp. in the morning, before I get my almond latte'! LOL!

3. I was born and raised in the Western US, but my *heart* is in the East! I always thought this was the case and, after visiting VA, MD & DC last September, that thought has been confirmed! I would ***LOVE*** to live there (I ***HATE*** the desert!!!)!

4. I have *extremely* strong feelings about things! (Oh -- wait -- that's not a little-known fact about me -- EVERYONE who knows me at all knows this! LOL!!!) BUT, I tend to back down on things that aren't as important, or just not push the issue if I think it will cause a major conflict. Guess I get that from my Dad! NOTE: I DON'T back down from my boys, though. And they don't like that very much! LOL!

5. If I had an "idol," my maternal grandmother would be it!!! She is THE most loving, genteel, gracious, elegant, and gifted woman I know!!! I want to be just like her when I grow up!

6. If I could play an instrument on a professional level, I would play the harpsichord (see #5 above -- my grandmother plays!!!).

7. Classical music (esp. sacred) is my VERY FAV!!! It just calms me! Having grown up in a family devoted to classical music (and with professional classical musicians) was a ***great*** gift and one I will always cherish!

I would talk about my faith in God, too, but I think everyone knows about that, so it wouldn't fit into the "little-known-facts-about-me" category! LOL!

So, now I get to tag someone else who blogs! I have to say, the only one I know who blogs and hasn't been tagged yet is Katie (http://www.stampingspot.blogspot.com/)! So, Katie, here is your tag! You're it!!!

Sunday, July 8, 2007

...And the Matching Card!

Here is the card I made to go with the Post-it Note holder in my previous post. It uses the same products, PLUS...

The Pale Plum strip was pierced using the paper piercer and...

...see the cute little mini-card on the front?!? It stays closed via this GREAT magnetic snap closure by Basic Grey! These "snaps" are just SPIFFY!!! They are only 1/16" thick when connected, have an adhesive already on them, AND they have enough magnetism to stay connected, despite the doubled ribbon between them! Now, if I'd been thinking ahead, I would have placed the bottom one underneath the Vanilla layer, to hide it -- but such is life... Since I don't always think ahead, the recipient of this card will just have to deal with it -- and I will know better next time! LOL!!!

By the way, I got these magnetic snaps at ***eP*** (http://www.eclecticpaperie.com/i-need-that.html), one of my VERY FAVORITE PLACES to shop!!! If you check it out, tell my friends Daisy and Joy that I sent you! (You'll LOVE what they offer!!!)

Here is the set together, so you can get the "big picture!" Hope you like it!

Friday, June 29, 2007

Carte Post-It!

I was sooooooooooooooooo happy to learn that Carte Postale made it into the new (Fall/Winter 2007) Stampin' Up! catalog!!! It is one of my very favorite sets from last year's mini-catties! So, I hastened to put together this FUN project! It just took me a while to get it posted! LOL!

I realize the Enchante' papers are retired, BUT the same design is available in NEW COLORS in the new catty!!! How fun!

This is a Post-It note holder, made with the heavy-weight coasters, Bind-It-All, and binding wires I got at eclectic Paperie (eP). Daisy and Joy are AWESOME to work with!!! So is the Bind-It-All! It can punch thru this heavy coaster with no trouble whatsoever!!! I did discover, however, that a heavy-weight coaster + designer paper (on both sides of the coaster) + card stock + twill tape makes it all a little too thick to place into the punching slot... So I don't think I'll put twill tape there next time! LOL!!! I ended up using my 1/4" circle hand punch to make the holes where the twill tape was.

This is the inside of the post-it holder. I used the other side of the paper that I had adhered to the outsides of the covers. Crystal Effects makes a GREAT glue for this. After adhering the papers, I sanded the coaster edges, punched the spine, and started embellishing with ribbon (twill tape & Ribbon Originals - Prep School - celery) and card stock. Tab was created with SU!'s tab punch. Layered medallion was stamped in Perfect Plum and colored with Watercolor Crayons and markers.

Once the ribbons were on, I bound the coasters together with the binding wires.


Then came the MOST FUN part! I LOVE making little 3-D embellishments! The larger flower was created by cutting a flower out of one of the Enchante' papers, adding the central flower and a black Vintage mini-brad, and shaping the petals. The smaller flowers were made by cutting out the flower from the medallion stamp in Carte Postale, after stamping it on different Enchante' papers and shaping the petals. The two flowers on the right also have the smaller, central flower, cut from paper in another shade or tint of the plum. Add a black Vintage mini-brad to the centers and you are done!

The leaves are simply the central flower stamped on celery DP and cut in half. I made the little bud with 1/2 of a plum flower and 1/3 of a celery flower. Roll the three plum petals into a cone shape and adhere the overlapping sides. Roll the two celery petals into a cone and adhere to the outside of the plum bud. Adhere to cover as desired. That's it!

Wednesday, June 20, 2007

Candy Sushi!

*GIGGLE!!!* So, aren't you tickled when you get an idea and it turns out EXACTLY like you were hoping?!? Well, I have to say, I just had one of those awesome experiences!!! I found this candy nigirizushi recipe (with the Swedish Fish) on AllRecipes.com, and once that turned out (SOOOOOO CUTE!!!), I had to move on with a lightbulb idea I had when making the nigiri... the makizushi (rolled sushi)!!! Check it out! I'm absolutely beside myself with glee!!! Hee, hee!!!

The base of both is just the Rice Krispie treat recipe. The nigiri base is hand-formed and set aside to cool. Then, the Swedish Fish are placed on top and Fruit by the Foot is wrapped around the entire piece, in the middle. Voila! Nigiri!!! (Aren't they adorable?!? Hee, hee!!!)

Here's a close-up of the nigiri...

The embellishments -- er, I mean, *garnishes* (I think I've got stamping on the brain! LOL!) are as follows:

"Grass": Glorious Green CS, cut just right

"Gari" (ginger): Sliced Laffy Taffy

"Wasabi": Molded Laffy Taffy

Hee, hee!!! I tickle myself!!!


And, here is a closeup of the maki:

The "innards" are made of Laffy Taffy, Chocolate Twizzlers, and Twizzler Pull-Aparts (hard to see... It's the little red dot).

Lay out 2 Laffy Taffy colors (green and yellow or orange) and stick them together. Add the thin red string on one side of seam and the chocolate on the other.

NOTE: Prepare all your candy strips first, or your Krispies will harden too much to mold (don't ask me how I know this! LOL!).

To assemble: Lay out a piece of waxed paper on the counter. Scoop some Krispies from the pan and form a small rectangle with it -- long enough to go the length of the candy and 3x as wide. Lay set of candies in middle of rice and wrap rice around candy, forming it into a log. Try to ensure the candy is in the center of the log, for the best results. Mold fairly tightly, to ensure it all stays together. Set log aside and finish others. Allow logs to cool COMPLETELY. Wrap each log with Fruit by the Foot (FBTF -- spiral wrap is good, overlapping edges just a tad). Press ends of FBTF to seal. Slice logs with VERY sharp, buttered knife, cleaning it as necessary. Enjoy!!!

Wednesday, June 13, 2007

Grad Season!

'Tis the season to honor graduates, so I made several graduation cards, all in their school colors! All the high school graduates in our youth group were girls, so I got to make a more girly card, instead of a more generic one. I've been wanting to use this Stampendous! Agapanthus Cluster stamp, so the grads gave me the opportunity to use it a bunch!


Aside from the Agapanthus stamp and the Cuttlebug embossing folder, all supplies are from Stampin' Up!


For the background pattern, I "Cuttlebugged" some brushed silver and gold CS, punched the panels with the ticket corner punch, and adhered the panel to the colored CS base (in this case, Brilliant Blue and Bravo Burgundy). Stamped the agapanthus and "rivet" in the card base color, distressed the flower panel with my distressing tool, then DTP'd the edges of the images with the appropriate Encore! metallic color (silver or gold). I then backed the images with CS and mounted the flower panel on the card. I made a slit in the card's fold for the grosgrain ribbon, then wrapped teh ribon around the card front and tied it in a square knot. Attached the rivet over the ribbon's knot with Dimensionals, allowing the ribbon ends to hang out of the center hole and then trimmed them to length.


Here is a closer view of one of the cards:


The following photo is the inside of the card... Guess I got carried away with the innards! LOL! Actually, I needed to add more sentiments and a short note to each of the grads, so this layout enabled me to do just that. Again, I used the ticket corner punch and DTP to add depth and personality.


So, that is my foray into the world of graduation cards this year! Fun stuff!!!


Saturday, June 2, 2007

Enchanting Fresh Bloom!


This Fresh Bloom stamp by Stampendous has me enthralled! Its simple beauty just screams, "Stamp with me! I'm FUN!!!" And, indeed, it is! Thanks, Daisy, for enabling my habit with your wonderful products!!! (This stamp is carried by Daisy & Joy in their online store, eP -- see previous post for link.)

So, I made some very-belated birthday cards with it (inspired by Julie HRR many weeks ago!) that should have been sent LOOOOOOONG ago! Didn't take too long, either, amazingly enough!!! (LOL!!! Did you know I get "paralyzed by perfection" all the time?!?) But, when I determine that SIMPLE is the key word, I don't get sidetracked by labor-intensive techniques that add a bunch of time to the project! LOL!


At any rate, here is the finished product -- two 4"x4" cards, using the Enchante' papers and coordinating card stock from Stampin' Up! Here are the deets...

For this card, I made a 3.75"x 3.75" card from one of the Enchante' papers, then backed it with a black 4"x4" square. I stamped the bloom off-center, then added the sentiment from the It's Your Birthday set (SU!). Feeling a need for embellishment, I added the Dazzling Diamonds glitter to the bloom center and stamens. Topped it off with a black organdy ribbon and, viola'! The card was complete! This card was created using the reverse side of the designer paper (DP) used above -- don't you think this fresh and youthful side is more appropriate for a 12-year-old girl?!? So fun! The bloom was stamped onto a piece of 3.75"x4.75" acetate with Staz-On ink. Once the ink was dry, Dazzling Diamonds glitter was adhered to the back side of the bloom with my 2-way glue (every girl likes glitter, right?!? LOL!). The extra inch of acetate was folded over (after scoring) so it could be attached to the back of the DP. The sentiment was stamped onto the reverse side of a scrap of the same DP, then trimmed to fit and attached to the DP card. The flourishes (from SU!'s Carte Postale set) were stamped onto the DP, eye-balling placement around the bloom. I should have used my Stamp-a-Ma-Jig for better placement, but I was in a hurry! LOL! The finishing touch was to attach the bottom of the acetate to the DP card with SU!'s Vintage brads in silver. A sweet card, don't you think? I hope she likes it!

Friday, June 1, 2007

Dutch Girl Birthday


My friend Corina is THE ORIGINAL Dutch Girl!!! LOL!!! seriously, she immigrated to the states from Holland when she was about 7 years old... So she even speaks the language! (Lucky lady!!!) And, she just celebrated her birthday this week!

Anyway, I thought that the Cosmo Cricket Dutch Girl papers would be PERFECT to use for her birthday card! ( know -- sometimes I'm in definite "cheesy" mode!!! LOL!) So, using the Dutch Girl crafting kit, I swiped the die-cut "C" from the letter pages and backed it with Stampin' Up's Ruby Red card stock, for a border. Ruby Red matches the red in the papers perfectly!

The card base is Ruby Red, with one of the patterned papers for a contsrasting panel. Another pattern was used for the red strip and edged with one of the "Paper Frills" by Doodlebug Design. SU!'s Vintage brads finish off the strip. The "Joy" sentiment is from SU! as well and was stamped in black on Whisper White CS, then punched out with the smaller of SU!'s two oval punches. The larger oval pounch was used on the red patterned paper from the Dutch Girl collection, to finish it all and tell Corina how much joy she has brought into my life by her friendship!

BTW, if you are looking for a great source for the non-SU! items used on this card, check out Eclectic Paperie -- http://www.eclecticpaperie.com/index.html -- that is where I got the paper frills and the Dutch Girl papers! My friends Daisy and Joy will treat you right and they have so many awesome things at eP!!!

I have to apologize for the poor coloring on this photo -- I am still learning how to "stage" these projects and get good images of them! Please bear with me as I work through this!

Happy Birthday, Corina!!! Hope this year brings all good things to you! Love ya!

Sunday, May 13, 2007

Easy Ruby!

I'm finally getting around to posting some paper-crafting things here and I'm very excited to share them with you! This starting piece was a VERY easy card I made for a friend's birthday, using the Stella Ruby papers by Basic Grey (got them from http://www.eclecticpaperie.com/index.html) -- luscious stuff, that really should be the spotlight of the card! So, that is how it was designed.


The top-fold card base is Pretty in Pink card stock from Stampin' Up! and so is the pink strip backing the second Stella Ruby paper (the stripe), which I cut with scallop scissors on both sides for a fun trim! After mounting the stripey strip (technical term! LOL!!!), I made a slit in the top of the card for the Cranberry Stitched ribbon (also SU!), then tied on the SU! Hodgepodge Hardware frame, which has the greeting stamped onto So Saffron CS and attached with mini-pop dots. I finished off the other side of the frame with a matching mini-brad.

The only stamping was the greeting and I didn't use any additional techniques on this card, such as DTP... So quick and easy, but elegant enough to be a Mother's Day card as well! Hope you like it...


M.

Tuesday, April 24, 2007

Melodrama Madness!

My son's 6th-grade melodrama performances last week went off well and the play was well-received by the audiences! It was a blast watching the kids' hard work (3 months' worth) pay off in this hysterical final product! They have only one more performance, at another grade school, and this saga will be over!

My in-laws even came for a visit just for this (they have a 7-hour drive to get here), and my son did them proud! LOL!

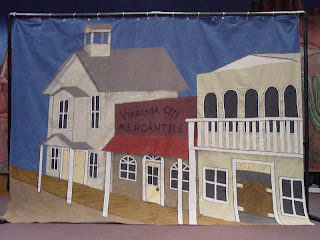
So, now that I FINALLY have decent photos of the melodrama backdrops... Here they are!

This is the BIG ONE! It is12' x 27' and was hung on the curtain track at the very back of the stage...


Here is one of the three smaller ones (9' x 12') we painted-- this one was used for the classroom and the wall behind the saloon bar:


Here is the street scene:


And here is the mercantile interior (the teacher's favorite!):


I wish I had gotten a less-fuzzy photo of the last one, and had better lighting for the big backdrop... But, oh well... Can't win them all!

So, as you can see, I've been plenty busy myself, creating the artwork for these backdrops and then helping paint them! I think it took us (the other parents and me) about 1.5 months' worth of work to get these done -- but it was sooooooooooooooooo worth it, and great fun!!!

The kids and the teacher loved the entire set! You should see the GREAT free-standing saloon doors that another mom made for the set! They actually swing just like the real thing! And other parents made the bar/mercantile counter, the PVC frame for the backdrops, "wagon wheels," "tree stumps," etc.! I tell you, these kids were SPOILED!!!! LOL!

Anyway, that is the result of my very first foray into the world of drama set production! Hope you like!